

How To Register On Yunyis
Viewing your security system outside of your dwelling or business tin can be every bit easy as scanning a QR code, entering in a verification code, and selecting Live View. This is easier than going into your Router'south IP address and port forwarding multiple ports and risking the liklihood that if irresolute your router you lot would have to Port Forward all over again. Cloud P2P is a simple and easy process that gives you that option.
In this post, nosotros're going to walk you through the steps you need to accept to set up your Cloud P2P account for recorders and cameras. If you'd rather watch the process, bank check out the video below.
Cloud P2P can exist accessed through your smart phone and tablet all through iVMS-4500 which you can download through the app store on your mobile devices. Cloud P2P is extremely piece of cake to set and only takes a few minutes. Cloud P2P makes information technology so uncomplicated that you will be able to view your security system within your home or business and outside your home and business organization without having to go to the attached monitor or estimator!


Once you accept the app downloaded, get ahead and become it prepare upwardly past selecting your region. Now you will see that a Alive View has shown up on your phone. This is where you volition shortly view your security system after yous have added the organisation to your Cloud P2P. Follow these easy steps to set upwards your Cloud P2P!
Setting Up Your Cloud P2P Business relationship
- Click the menu icon in the meridian left of your Alive View and select "Cloud P2P."
- In the Cloud P2P section you will be asked to annals, located on the bottom of the screen. This is a free account and will be used to log into your Cloud P2P for you to view your Arrangement.
- Enter in the electronic mail that you would like to use, the verification code on the right side of the verification lawmaking line, and so select get verification lawmaking. Y'all will receive an email with a verification code to commencement your business relationship.
- Enter in that verification code that was sent to your email and you will be taken to fix a username and password for the account.
Congratulations! Yous take but set upwardly your Cloud P2P account!
This guide assumes that yous take already configured your IP address for your camera or NVR/DVR, if non and y'all need some help, please refer to this guide. It will walk you through the process.
- Assigning an IP Address to your IP Photographic camera
- How to Network Your NVR
Preparing Your IP Camera for Cloud P2P
We're going to start off with using Cloud P2P on an IP photographic camera. For this demonstration I am using camera model NSC-204-BT.
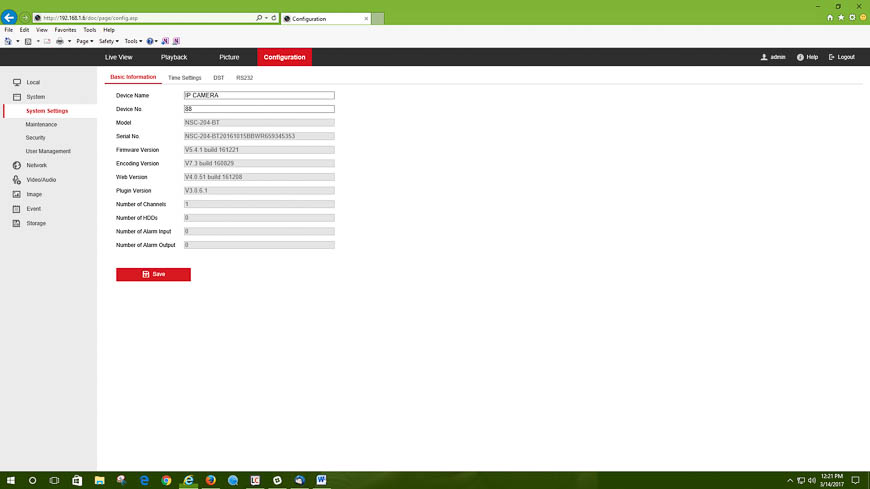
Earlier you tin add the camera to your Cloud P2P account you lot volition need to cheque and make sure y'all have the correct firmware. Your camera volition need Firmware Version five.iv.i or in a higher place in order for you to access the camera on your Cloud P2P account.
You can locate the firmware under configuration, head over to system so arrangement settings. If y'all are in need of the firmware to update your camera please check our website for the latest firmware.
After this, your camera should be up to date and you can now add the photographic camera to Cloud P2P by following these steps:
- Go to the Configuration menu on the camera's interface, so to the Network tab.
- At the lesser of the Network tab, you will find Preferred and Alternate DNS Server. In the "Preferred DNS Server" type "8.8.8.8," and in "Alternate DNS Server" type "viii.8.4.4."
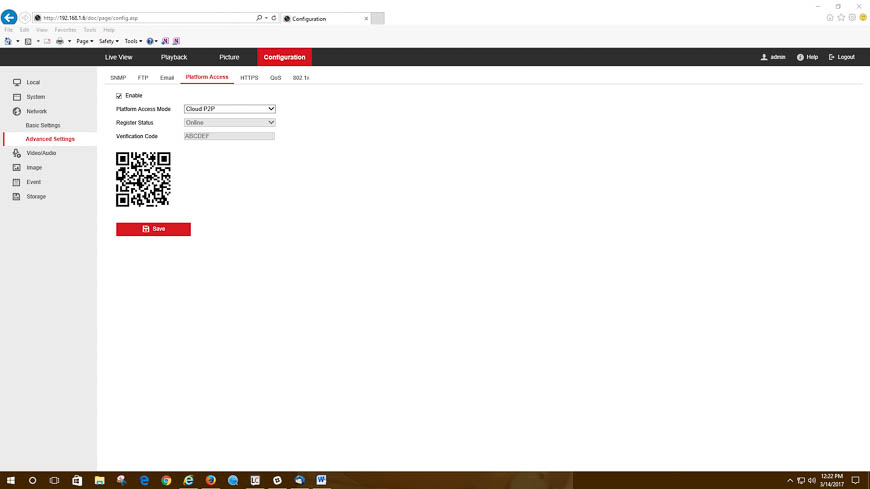
- Save that and get to Advanced Settings under Network.
- In Advanced Settings go to Platform Access and brand sure your telephone or tablet is ready and logged into the Cloud P2P account that was created in the previous section. If Enable is not checked for Platform Admission, click that and select salve.
Adding the Camera to the Deject P2P Account
- In the account you lot will become to the circle in the top correct to access the QR Code Scanner.
- Scan the QR code that is displayed on your figurer screen. New Device will show up with a nine digit number and below that you volition see your camera model.
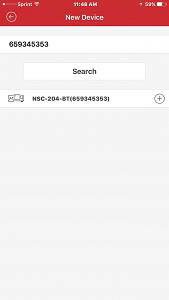
- Click on the plus button on the model number of the camera. A new screen will testify up asking for a verification code.
- Look at your computer monitor and there will be a verification lawmaking. Enter in that code, it is case sensitive.
- Once yous hit enter, your device is added and you will at present be back to the main screen. This time your camera volition be there.
- Click on the camera model number and select Commencement Live View.
- You will demand to enter in the Verification Code one more time to get a live view afterwards you accept entered in the verification code once more you at present have video feed from the camera.
Cloud P2P With NVR / DVR
Now that you lot know how simple information technology is to prepare your camera on the Cloud P2P, let's add together an NVR or DVR. It will be the same process as adding a camera merely this time yous volition demand to have a monitor attached to the NVR or DVR.
At this indicate nosotros are assuming that yous have already fix your NVR or DVR. If you have not and you need help please follow this link to our helpful guide:
Initial Setup for your H Series NVR / DVR
- On your attached monitor you will need to right click and select Menu. Enter your username and password for the NVR or DVR.
- At present that you are logged in, get to Configuration and select Network on the left side. Toward the bottom you will need to change the Preferred DNS Server to eight.eight.8.8 and the Alternate DNS Server to 8.8.four.4. Go to the lesser right and select save.

- On the same page you will see Platform Access, make sure that enable is checked. You will need your telephone or tablet at this time and you will demand to be logged into the Deject P2P account.

- Just like you did with the camera, go to the Circle in the top right and scan the QR code that is displayed on the attached monitor. It will show the NVR or DVR on your device.
- Become to the plus button on the model number and enter in the verification code that is on the attached monitor in the same screen where the QR code is.
- Select enter, click on the model number of the NVR or DVR and Outset Live view! Y'all can view all of your cameras that are configured with your NVR or DVR.
And that'southward all at that place is to it! You can now enjoy the convenience of viewing your cameras someday and anywhere with the help of your Cloud P2P account. If you lot got stuck along the way or if you have whatsoever additional questions, please don't hesitate to reach out to u.s. anytime.

How To Register On Yunyis,
Source: https://www.nellyssecurity.com/blog/articles/video-surveillance/cloud-p2p-cameras-recorders-tutorial
Posted by: gillhoch1980.blogspot.com
0 Response to "How To Register On Yunyis"
Post a Comment